by Łukasz Piątkowski on Apr 28, 2020

An in-depth series on how to easily get centralized logging, better security, performance metrics, and authentication using a Kubernetes-based platform.
This is the second part of our tutorial. If you haven’t seen it, please check out Part 1, How the Cloud-Native Stack Helps Writing Minimal Microservices.
Introduction
In this section, we’ll focus on creating the application. We’ll start with requirements and architecture, and then move to the actual code. Please note that there are hardly any changes in the code that integrates with the cloud-native platform we prepared in Part 1.
Requirements
To demonstrate what our Kubernetes-based platform can provide to application developers, we’ll create a typical “todo list” application in a microservice architecture.
Let’s start with the requirements we have for it.
Functional requirements:
Create a todo list management application, that:
- Allows users to create, delete, and update a todo entry.
- Keeps all todo entries in a single list.
- Every user of the application has her/his own list and can access only the entries s/he has created.
Non-functional requirements:
- Components need to be scalable.
- Logs need to be provided in a structured way in JSON format.
- As the target platform is Kubernetes, we need to support readiness probes.
- For easy configuration, components need to be configured using environment variables.
Architecture
Now that we have our requirements, it’s time to switch our focus to the application’s architecture. We’ll create two main components and use a MySQL database as a persistent data storage for them.
The idea is shown in the diagram below:
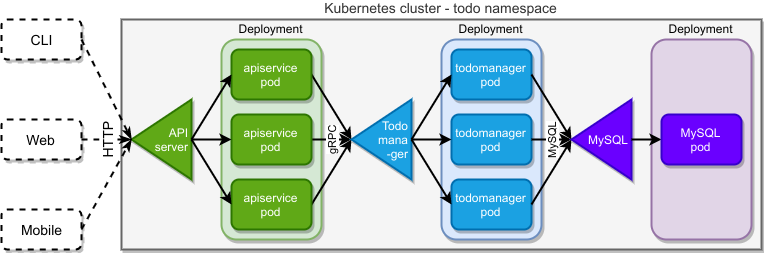
Our application is going to offer an HTTP based REST interface. Exposing the API to the clients is a task of the green “API service” layer. This layer will be responsible for handling HTTP requests, validating them, logging all requests, and providing authentication. As we’re abstracting from the clients, this API can be used by anything that can send HTTP requests, which includes mobile, web, and even CLI applications.
To keep the scope of this blog entry limited, we won’t be implementing actual clients and we’ll just use the curl command for testing the API. We’re also exposing the API over plain HTTP only, which is, of course, unacceptable in production, but again will let us limit the scope a little. This will also make testing easier and will free us from caring about HTTPS certificates.
In the architecture diagram above, API service is the gateway to our system. When a request passes this gateway, behind it lies the land of different microservices, that cooperate to provide the necessary service. In our case, the application is so simple, that the whole business logic is provided by a single service called “todo manager”. To better show how Kubernetes platforms allow you to deploy and manage multi-protocol multi-language solutions, we’ll switch the communication protocol to gRPC here. As we want our “todo service” to be stateless and easily scalable, it won’t keep any persistent data. This task will be delegated to the MySQL database that we inject into our solution.
Implementation
Short version
If you’re not interested in implementation details and just want to build the application and run it, the code is already in the repository, so please skip to Building the Application.
Long version
We need to implement two services, one being an HTTP server and one gRPC. We’ll use Golang for both, as it’s a good match for our Kubernetes-based environment and we can use some existing tools and libraries to create our code in a very effective way. I won’t cover every line of code here, but only point out some more important parts.
Let’s start with something basic: our communication contract for both services.
Communication interfaces
We need to define a communication interface for our two microservices. First, let’s define JSON requests and responses our REST API gateway will serve to clients. Our only resource is called todo:
type Todo struct {
    ID   string `json:"id"`
    Text string `json:"text"`
    Done bool   `json:"done"`
}
This object will be sent every time a todo or a list of todos is processed by our clients. Please note just 2 things. The ID is populated by the service and the client never sets the ID. Secondly, we don’t have any owner information here. Right now, we’re skipping authentication in the REST layer. Still, we want to already include owner information processing in our application, as stated in requirements. In the future, when authentication is added to the REST layer, we’ll get real username information from our HTTP request context. For now, we’ll use a simple placeholder in the form of a constant username in the code:
// Username is a temporary value for all user name fields until we get proper authentication in place
const Username = "anonymous"
// Username is a temporary value for all user name fields until we get proper authentication in place
const Username = "anonymous"
Our API endpoints use a typical REST approach, we prefix all of them with “v1/todo” and then expose:
- POST to “/” - to create a new request (accepts todo struct and returns ToDo struct)
- GET to “/” - to list all todos (the todo list) of a single user (accepts no parameters and returns a JSON list of todo)
- GET to “/{todoID}’ - to get a single todo with a given ID (accepts no parameters and returns a ToDo)
- PUT to “/{todoID}’ - to update a single todo with a given ID (accepts a todo and returns a todo)
- DELETE to “/{todoID}’ - to delete a single todo with given ID (accepts no parameters and returns a simple JSON response with a single boolean field called “success).
Details of this REST API are in “api-server/pkg/todo/routes.go” and “api-server/pkg/todo/model.go”.
Our second interface is between the api-server and todo-manager services. This one is based on gRPC, so the whole interface is described using the protobuf syntax:
service TodoManager {
    rpc CreateTodo(Todo) returns (Todo);
    rpc ListTodos(ListTodosReq) returns (stream Todo);
    rpc GetTodo(TodoIdReq) returns (Todo);
    rpc UpdateTodo(Todo) returns (Todo);
    rpc DeleteTodo(TodoIdReq) returns (DeleteTodoRes);
}

message Todo {
    uint64 id = 1;
    string text = 2;
    bool done = 3;
    string owner = 4;
}

message TodoIdReq {
    uint64 id = 1;
    string owner = 2;
}

message ListTodosReq {
    string owner = 1;
}

message DeleteTodoRes {
    bool success = 1;
}
As you can see here (todo-manager/pkg/proto/todo.proto), we’re mapping our REST interface directly to the gRPC calls, just remembering to add “owner” information to every request, so the todo-manager can filter ToDo entries by ownership.
API server
Our API server is really simple. Its main aim is to act as a gateway between REST endpoints and gRPC microservices. Typically, such gateways also integrate authentication and authorization, rate limiting, API keys etc. For now, our gateway will stay very simple and will just pass the requests to the microservices. We’ve already covered the api-server/pkg/todo/model.go” file when discussing interfaces. The “todo-manager/pkg/proto/todo.pb.go” has a lot of code, but it’s all auto-generated. That’s just the way protobuf and gRPC work: they use the “todo-manager/pkg/proto/todo.proto” file to generate server and client stubs for you. Here we’re using the generated client to pass our REST API calls to gRPC. The gRPC client connects to the gRPC server in “api-server/pkg/todo/routes.go:L30” and REST API is mapped to gRPC in line 42. Note that we disable gRPC TLS security (line 28). We’ll be relying on our Linkerd to provide encryption here.
Todo manager
The aim of this microservice is straightforward: get data from the gRPC calls, check for ownership and get the data to/from the database. To keep this last part as short and simple as possible, we’re using the gorm.io mapper here. The object that we use to map our data to the database is in “todo-manager/pkg/server/model.go”. We just need to know where the database is - that’s the role of the Config struct in “todo-manager/pkg/server/config.go”. It loads our configuration from environment variables and stores them. Actual requests-serving logic is in “todo-manager/pkg/server/server.go”, starting in L46. One thing that might be strange there is how we send a response to the “ListTodos()” call. This is the so-called gRPC stream response. Using this, a server can start sending a collection of objects as soon as they become available, without waiting for the whole list to be available (which is not the case in our code). Also, using stream response a gRPC client can start processing elements on the list as soon as the first one is available.
Building the application
For both our go projects, we’re providing a Makefile, which makes building the projects easier. It also injects version, commit, and build date in Go code before compiling into binaries, so we can better identify versions of software we’re deploying. So, to build our go binaries, we just have to run make in both “api-server” and “todo-manager” catalogs.
The next step is building docker images that we’ll run on our Kubernetes platform. The problem is that we need to make these images available to our minikube cluster later. Normally, this is done by using an image registry: we build the images, push them to the registry, then container runtime in the Kubernetes cluster pulls them from the registry when it starts the applications. Here, we’ll use a simpler solution that doesn’t need an external registry. Using minikube, our whole cluster has just a single docker instance as a container runtime, running in the virtual machine that minikube created. This docker is available over the network, so we can use it remotely, from our native in-system docker installation. To make this work, we just need to ask our local docker client to talk with a remote (minikube) docker server instead of the local server. To configure this, we need a few environment variables to point to the minikube’s docker.
Fortunately, minikube provides a ready command for that:
eval $(minikube docker-env)
Now we can build Docker images and save them in the minikube’s docker directly. Again, in both “api-server” and “todo-manager” directories run make docker-build. When it’s done, our images are ready and present in the Kubernetes cluster. Verify that by running docker images. Now it’s time to work on the deployment of our application.
In Part 3 of our series, we’ll focus on how to deploy the application with Helm.
About Giant Swarm
When running Kubernetes clusters in production, you will realize that you will need more, sometimes much more, than just one cluster. You will need to care not only about the deployment but also upgrades, security issues, and monitoring.
That’s where Giant Swarm can help — we offer managed Kubernetes clusters so that you don’t have to worry about managing them yourself. We also offer managed applications — well-known cloud-native projects that we can run for you on top of your Kubernetes cluster, creating a fully managed cloud-native platform.

Managing the Security of Kubernetes Container Workloads
In this series of articles entitled Securing Kubernetes for Cloud Native Applications, we’ve discussed aspects of security for each of the layers that …

Part 5: Traces of Your Microservices
Introduction Welcome to the fifth part of our blog series that focuses on how to develop, deploy, and debug microservices running in the cloud-native …

Applying Best Practice Security Controls to a Kubernetes Cluster
This is the penultimate article in a series entitled Securing Kubernetes for Cloud Native Applications, and follows our discussion about securing the …