by Łukasz Piątkowski on Apr 2, 2020

Part 1: The Kubernetes Platform
An in-depth series on how to easily get centralized logging, better security, performance metrics, and authentication using a Kubernetes-based platform.
Introduction
This post marks the beginning of our series about creating cloud-native applications that run in a cloud-native platform. By ‘cloud-native platform’, we don’t mean just Kubernetes, but a fully featured solution that includes different applications that can help you with log management, security, and observability of microservices-based solutions.
We’ll show you step-by-step how to create a microservice application in Go from scratch. This will illustrate that there’s no need to modify your application to get all of the benefits of the cloud-native stack, so it’s easily applicable to existing applications as well.
In this tutorial, we want to give you a complete overview of both the platform and code. Our goal is to get enterprise operational properties for an application with as few tools as we can.
-
We’ll start by creating a development environment that introduces the cloud-native stack of applications we want to use.
-
Then, we’ll show you how easy it is to create an application that can benefit from the setup.
-
Later, we’ll move to the application’s deployment to show you how we can tackle multiple problems with cloud-native features.
-
Once we’re done with that, we’ll explore features of the platform we created and show you how you can use them for operations.
Kubernetes as a platform for enterprise applications
In this series, I want to focus more on a platform we can build on top of Kubernetes and on the code that we need to write. However, it’s impossible to ignore some elements provided by Kubernetes itself. So, let me introduce the heroes of our story, our interface to the cloud-native world, both from the Kubernetes API, and other tools from the community.
Below is a list of a few native Kubernetes features that will be of particular interest to us:
-
Deployment
Deployment is a Kubernetes concept that allows you to run a specific number of copies of your application containers (called Pods). It watches that number and recreates any pods that fail, either due to software or hardware problems. It also allows you to do rolled releases of new versions of your software.
We wrote about it in one of our previous blog posts. You can learn more from the official docs as well.
-
Service
Service acts as a software load balancer for a group of Pods. It usually targets a single deployment and exposes its Pods to external users.
We have some more details in another blog post and you can read the concept explanation for Service too.
-
Network Policies
Network Policies define whom your Pods can talk to over the network. Basically, they are a form of a firewall for Kubernetes. We need them to provide network layer security.
Check out the Network Policies explainer for further details.
-
Pod Security Policy (PSP)
PSP is a kind of privilege control framework. It allows you to set and enforce rules that forbid your Pods from doing some privileged system operations that pose a security risk and are not needed for your Pods.
Explore Pod Security Policies if you’d like to learn more.
-
Role-based Access Control (RBAC)
RBAC is a set of rules that control which Kubernetes API objects (like Deployments, Services, PSP) can be accessed by your Pods. Our application won’t need any Kubernetes API access, yet we need a simple set of RBAC rules that allow the application to access the PSP object we need to set up.
Take a deep dive into the topic, add this to your bookmarks: Role-based Access Control.
Now, let me introduce the projects we will use on top of Kubernetes to create our microservices platform:
-
Linkerd is a service mesh. It’s a tool that gives you better visibility and control over your microservices setup. We’ll use Linkerd to provide better security (automatic TLS encryption of service-to-service communication), get basic performance metrics, and execution tracing. One of the biggest advantages of Linkerd is that it’s really simple to use.
-
Loki is still a pretty new log management system. It’s a new project in the Elasticsearch dominated landscape. Still, we’ll use Loki because it’s easy to set up and it’s integrated with Grafana, which we need for Linkerd anyway.
We wrote about Loki in a previous blog post.
-
Grafana is a data visualization tool. We’ll use it to graph performance metrics from Linkerd and show logs from Loki.
Preparing a development platform
We want production-grade properties from our application, but we need to develop and test it somewhere. As I mentioned in the introduction, setting up and running a Kubernetes platform is a topic on its own. Here we set up a development environment that will allow us to run and see our application in action.
Let’s start by checking out our repository for this blog entry. Once done, let’s switch to the “basic” branch:
git clone https://github.com/giantswarm/giantswarm-todo-app.git
cd giantswarm-todo-app
git checkout blog_v1
Development environment
Our application will be written in Go, so please visit the installation docs and install Go, if you don’t have it already. I’ll be using Go 1.13.1.
For code editing, use whatever works for you, but if you’re looking for a good place to get started, I recommend VS Code with the Go plugin. We’ll also use Makefiles to build our code, so make sure the make tool is installed.
Kubernetes tools
There are a few good projects that allow you to set up a development Kubernetes environment and Minikube is probably the most popular one. Please follow this guide to install minikube for your operating system. We also need kubectl - if you don’t have it, have a look here. Please also install VirtualBox as a virtualization platform for minikube. To install this one, follow the instructions here.
Don’t start any cluster yet. Just make sure the following tools are operational:
- VirtualBox (I’m using v6.1.4)
- Kubectl (I’m using v1.17.0)
- Minikube (I’m using v1.9.0)
Additionally, we need to install 2 more tools:
-
Actually, Docker will be already installed as a container runtime by Minikube, but this is going to run inside a virtual machine. To make our lives easier, we install Docker also directly on our development machine (I’m using Docker Engine - Community v19.03.6).
-
Helm is like a package manager or software installer for stuff you run on top of Kubernetes. We’ll use it to deploy components of our Kubernetes platform (I’m using Helm v2.16.5; be careful to not use Helm 3 for now, we’re still using Helm 2).
Kubernetes platform environment
After we have all the tools in place, we can start by creating our Kubernetes installation with Minikube running on a virtual machine with 4 GB of RAM and 2 CPU cores (that’s the recommended size for this tutorial).
minikube start --kubernetes-version='v1.17.0' --memory='4g' --network-plugin='cni' --vm-driver='virtualbox' --cpus='4'
Now, wait until the virtual machine is started by Minikube.
After Minikube is done, we need to add one label to the kube-system namespace — it will be used later to select network traffic going to this namespace:
kubectl label ns kube-system name=kube-system
Kubernetes doesn’t come with any default networking (CNI) driver, so we need to install one on our own. We use Calico for that. Run:
kubectl apply -f https://docs.projectcalico.org/v3.13/manifests/calico.yaml
Now, start:
kubectl -n kube-system get pods -w
and wait until everything has “Status: running” and “Ready: 1/1”.
Now that our Kubernetes is ready, we deploy Linkerd, Loki and Grafana using Helm. First, let’s initialize Helm:
helm init
Then, verify that a pod with a name starting with tiller-deploy is “Ready: 1/1” and “Status: Running”:
kubectl -n kube-system get po
Lastly, we need to add Giant Swarm’s helm repositories to our Helm config. We use them to install applications prepared by our team, including Loki, Grafana and Linkerd. We add both the primary “giantswarm” catalog, as well as the “playground” catalog. You can learn more about our application catalogs here. Over here, we use them as plain Helm chart repositories.
$ helm repo add giantswarm https://giantswarm.github.io/giantswarm-catalog
$ helm repo add giantswarm-playground https://giantswarm.github.io/giantswarm-playground-catalog
$ helm repo update
Installing Linkerd
As mentioned above, Linkerd can provide better security by introducing mTLS. Still, it needs cryptographic certificates to do that.
To make it easier, we’ll install an application called cert-manager, which will create certificates for Linkerd dynamically. We install it with:
helm install --namespace kube-system -n cert-manager --version=1.0.6 giantswarm/cert-manager-app
Now we can install Linkerd.
We need to set 2 options during installation. The first one configures the chart to use certificates created by cert-manager.
The second one creates an admin level (instead of read-only) account in Grafana that is included in the chart, so we can customize Grafana later.
To make it easier, the repository contains a ready to use configuration file for Linkerd deployed with Helm — we just need to point to “./helm/configs/linkerd.yaml”:
helm install --namespace linkerd -n linkerd -f ./helm/configs/linkerd.yaml --version 0.2.1 giantswarm-playground/linkerd2-app
Give it a few minutes to initialize, then check if all the pods in Linkerd namespace are ready:
kubectl -n linkerd get po
Check that you can access Linkerd web dashboard. Run this command in your terminal:
kubectl -n linkerd port-forward service/linkerd-web 8084
Now, visit http://localhost:8084/overview in your browser.
You should see a default dashboard, as below. In the dashboard, click any of the icons in the “Grafana” column. You should be redirected to a grafana web interface.
Keep your port forwarding in the terminal up and let’s move to the next application.

Installing Loki
Installing Loki with Helm for development purposes is pretty easy. After Loki is deployed, we need Grafana as a web UI to show logs from Loki. Grafana is already deployed by Linkerd, so we’re going to reuse it. Install Loki by running:
helm install --namespace loki -n loki --version 0.2.0 giantswarm-playground/loki-stack-app
Wait until the Pods in namespace Loki are up:
kubectl -n loki get po
Now, with port forwarding still enabled from the Linkerd setup step, visit http://localhost:8084/grafana.
In the left-most menu, select the cog icon and go to “Configuration -> Data sources”.
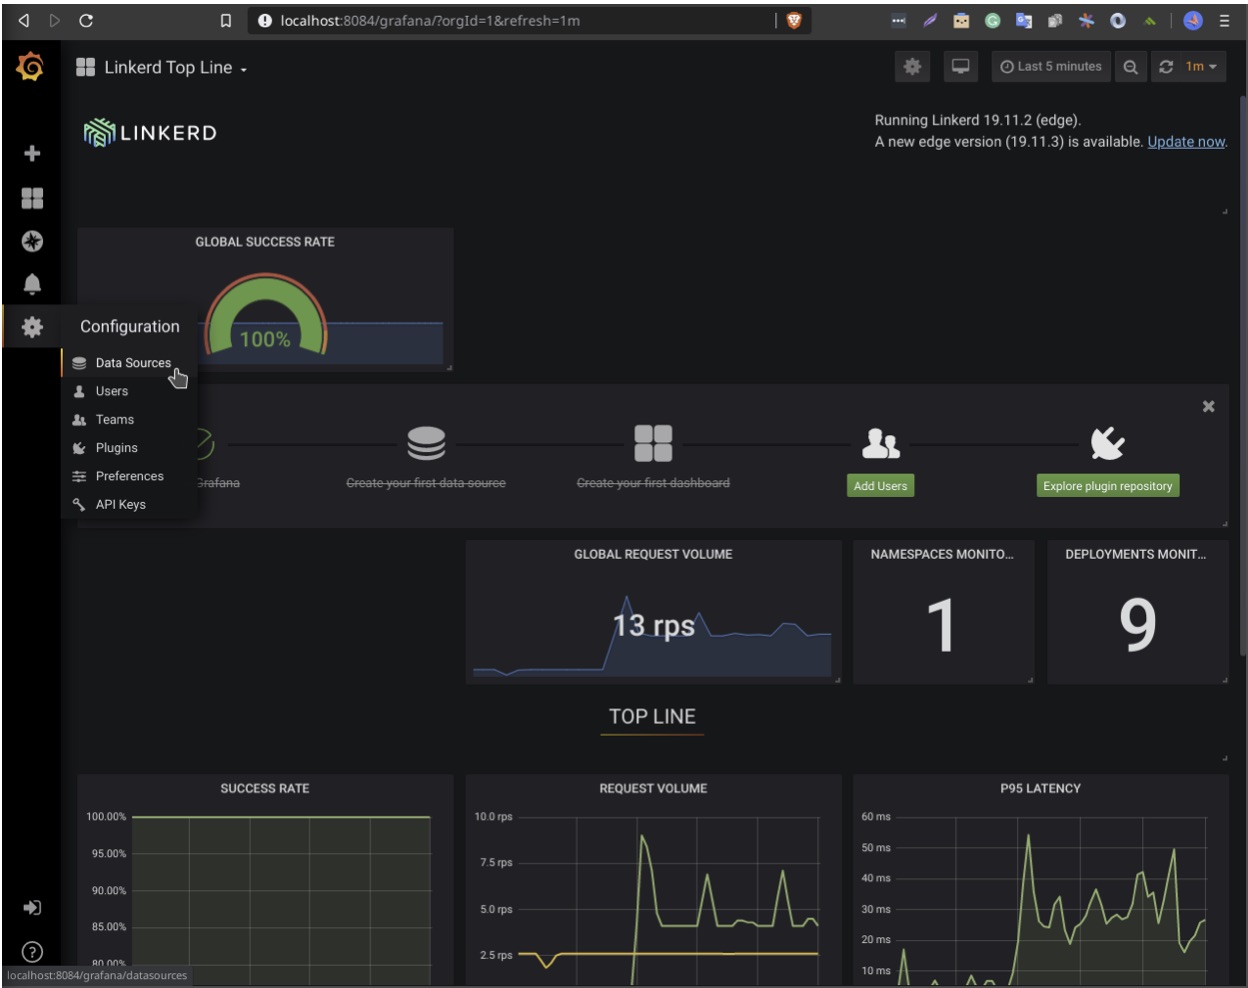
Click the green “Add data source button” and select “Loki”.
Fill only the URL field with http://loki.loki:3100 and click “Add and test”.
Our Loki should be now available as a data source. To check that, from the left menu select the compass icon and click on “Explore”. Make sure the data source type in the top is set to “Loki”, then select from the “Log Labels” values “app -> loki”:
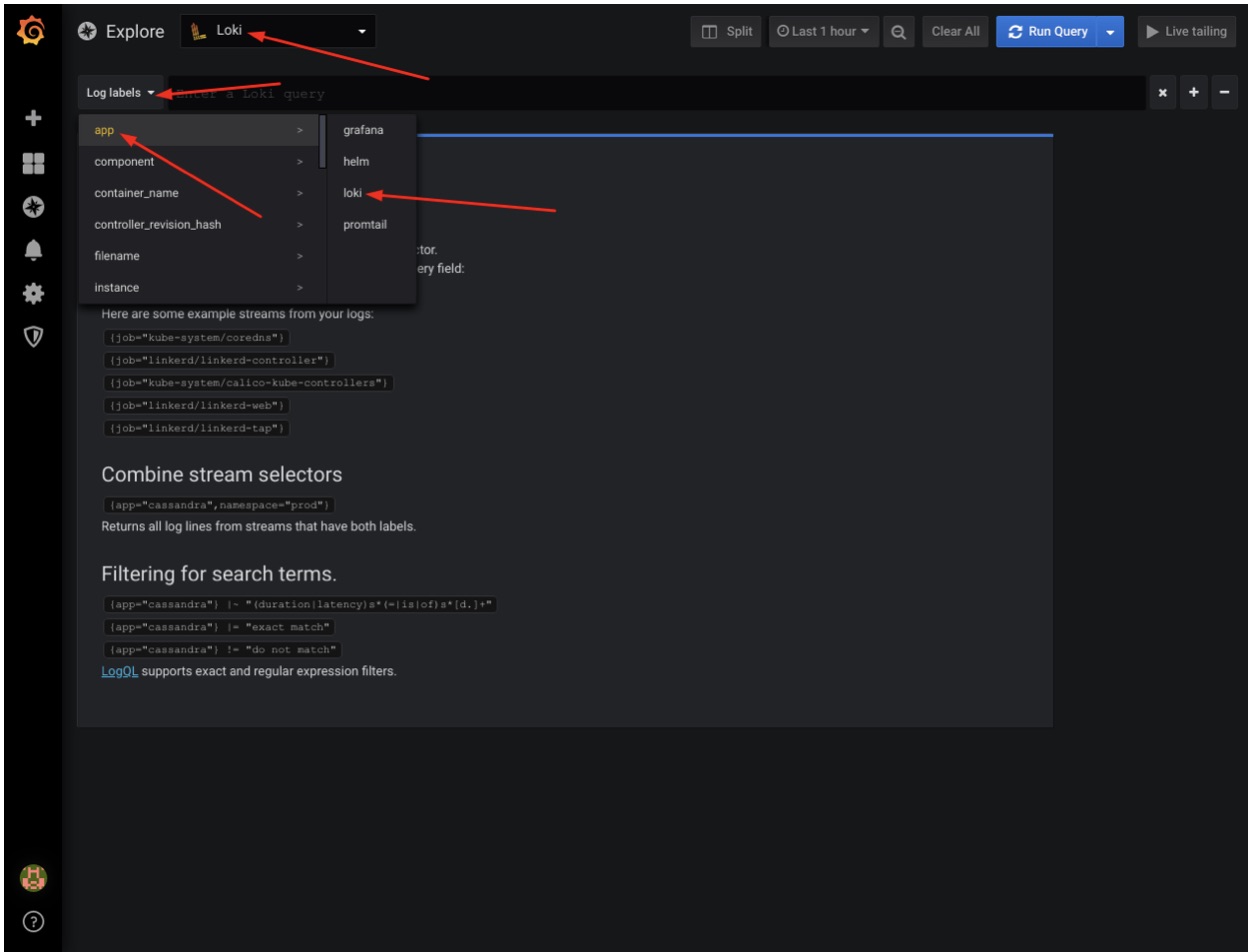
You should see Loki logs displayed in Grafana. If everything works, terminate the “port-forward” command in your terminal with Ctrl+c.
Our development platform is now 100% ready, let’s write some code! In Part 2 of our series, we’ll create the actual microservice application, stay tuned!
Our platform and about Giant Swarm
At Giant Swarm, we appreciate the huge difference between a development environment and an enterprise-grade production environment. Our mission is to bridge that gap for you so that you don’t have to navigate the complexity on your own.
We can get you up and running with a production-grade Kubernetes cluster in minutes. If you are running on AWS, the above-mentioned cert manager is already built-in. Giant Swarm customers also already have Loki, LinkerD, and Grafana available in the playground catalog.

Part 3: Deploying the Application with Helm
An in-depth series on how to easily get centralized logging, better security, performance metrics, and authentication using a Kubernetes-based platfor …

Part 4: Operations and the Cloud-Native Stack in Action
An in-depth series on how to easily get centralized logging, better security, performance metrics, and authentication using a Kubernetes-based platfor …

Application Configuration Management in Kubernetes
Generally, cloud-native applications are characterized by small, independent units of functionality called microservices packaged into containers. Arc …