by Łukasz Piątkowski on May 27, 2020

An in-depth series on how to easily get centralized logging, better security, performance metrics, and authentication using a Kubernetes-based platform.
Introduction
This is the third part of our tutorial for creating and deploying an application with the cloud-native stack. Part 1 discussed how to set up a development environment, while Part 2 discussed building the actual application.
In this entry, we want to address the deployment problem: how to package and prepare our application for deployment on our platform.
TL;DR version
In this part, we’ll prepare a Helm chart for our application. We could do the same thing with just Kubernetes manifests and the “kubectl” command, but this way we’re able to deploy all components of our application with a single Helm command. We can also make the Helm chart available online, so it’s easier for others to find and install it. If you’re not interested in the deployment setup details and don’t want to deploy the application step-by-step, don’t worry; both Docker images and the Helm chart are available publicly.
BTW, if you haven’t followed Part 1, please make sure to configure your helm repositories by running:
$ helm repo add giantswarm https://giantswarm.github.io/giantswarm-catalog
$ helm repo add giantswarm-playground https://giantswarm.github.io/giantswarm-playground-catalog
$ helm repo update
To install the ready Helm chart, just run:
helm install --name gs-todo --namespace todo --version 0.2.7 giantswarm-playground/giantswarm-todo-app
Then, you can continue to the part about operations and benefits.
Long version
When preparing the deployment manifests for our applications, we’ll use standard Kubernetes components introduced in Part 1: The Kubernetes Platform. To make it easier, we’ll pack them together as a Helm chart and add MySQL in the process as a dependency.
If you don’t have our tutorial’s repository checked out yet, execute the following steps:
git clone https://github.com/giantswarm/giantswarm-todo-app.git
cd giantswarm-todo-app
git checkout blog_v1'
Deployment overview
Let’s have a look at what we want to create:
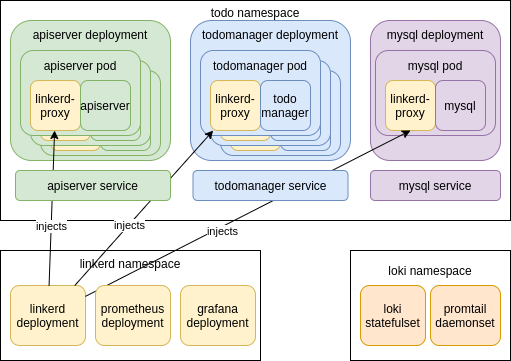
The Helm chart is just a set of Kubernetes resources, so we need to start with the Kubernetes basic building blocks. The diagram above shows the main components we have to create in the “todo” namespace. Basically, they include a “Deployment” for the “apiserver” and “todomanager” components of our microservice application and a “Service” for each, to act as a load balancer for accessing the pods.
The MySQL part will be provided by composing Helm charts. When creating a Helm chart, you can point to other Helm charts that act as a requirement for the chart you’re creating. For that purpose we will use the public MySQL chart and avoid writing this part on our own.
The graph above also shows some software deployed to “loki” and “linkerd” namespaces. These were already created for us when we deployed Loki and Linkerd with Helm in Part 1 of the tutorial. Still, here’s a good place to have a second look at what was deployed there.
The Loki chart deployed two things:
- “Loki statefulset”
- “Promtail daemonset”
This runs the actual Loki server that stores the logs and responds to log queries. “Statefulset” is a Kubernetes tool similar to Deployment but meant to run stateful workloads.
This runs the Promtail tool, which is started on each host of the Kubernetes cluster (that’s what a DaemonSet does). This tool traces all logs written by pods running on the specific cluster node and forwards them to the Loki server for storage.
The Linkerd chart deployed multiple Linkerd services, let’s name just the ones most important for us:
- “Linkerd deployment”
- “Prometheus”
- “Grafana”
This is actually a whole family of Deployments, but the important one is “linkerd-proxy-injector” (not shown directly on the picture). As you can imagine, for Linkerd to be able to trace every request that is directed to our services, it needs to use a proxy in front of the containers running our application. It does this by injecting dynamically a new container called “linkerd-proxy” into each of the pods deployed for our application. Since a Pod is a set of containers running together, this fits nicely into this Kubernetes unit of deployment. Inside the Pod, “linkerd-proxy” acts as a proxy for all incoming and outgoing traffic to other containers of the pod and forwards traffic information to other Linkerd services running in the namespace.
This is the hidden hero of our story. Prometheus is the metrics server that is now the de facto standard for collecting and analyzing metrics data in Kubernetes clusters. Linkerd uses it to fetch and store all of its monitoring metrics. Prometheus is now hidden in our tutorial, but we will come back to it later and give it more attention.
We already saw Grafana is our web UI for viewing data coming from two sources: the Prometheus server for metrics and Loki for logs.
Creating the “Todo” chart
The whole source code of the chart is available in the “helm/giantswarm-todo-app” directory. “Chart.yaml” describes the helm chart itself. The “requirements.yaml” lists additional sub-charts we want to use. In our case, it’s “mysql”, an external public chart we downloaded and placed in the “charts/” directory, which is meant for sub-charts.
The last top-level file is “values.yaml”, which contains the templating variables that can be changed by the Helm user. Our actual deployment manifests are placed in the “templates/” directory. I won’t be writing about every single detail in them, but let me point out a few interesting snippets.
A few files in the “templates/” directory have a more global character. The rest is either about the “apiserver” or “todomanager”. The global ones are:
- Hook-pre-install-annotate-namespace.yaml is for adding the “linkerd.io/inject=enabled” annotation to the namespace where we are deploying our application. When a namespace is annotated this way, Linkerd will automatically handle all pods in the namespace and inject the “linkerd-proxy” containers required for Linkerd to work.
- Mysql_networkpolicy.yaml provides a network policy that allows “todomanager” to establish connections to “mysql”. Since we’re creating network policies for all of our components, we have to remember that MySQL is included as a sub-chart, as otherwise our pods won’t be able to connect to “mysql” at all.
- Psp.yaml defines our pod security policy. This makes our application compatible with clusters that provide strict security and enforce PSP presence (giantswarm clusters do that). Our policy denies usage of privileged containers or sharing namespaces with a host, but because we use Linkerd, we have to allow for some permissive options. This comes from the fact that Linkerd actually injects additional containers into our pods, so our pods need to be able to do what Linkerd requires. That’s the reason why we have a few “NET_*” capabilities enabled in lines 15-17 and why we’re allowing the processes in the container to run as root, but only if Linkerd is enabled (L36-40).
- Rbac.yaml configures the permissions that our pods need for accessing the Kubernetes API. We don’t have any such requirements in our application, but we still need to allow our pods to use the PSP (L14) that we created in psp.yaml.
Now, “apiserver” and “todomanager” are very similar, their basic building blocks are a Deployment and Service and they are placed in respective files with either a “apiserver_” or “todomanager_” prefix. Let’s point out a few things using “apiserver” as an example:
- In “apiserver_deployment.yaml”, we remember about setting a few important things:
- Use a separate Service Account to avoid accidental sharing of privileges with other pods in the future (L21).
- Using the “affinity” property to avoid (during scheduling) placing our pods in a single node and availability zone (if possible). This is actually included in L23 from _helpers.tpl L54-82. That way the Kubernetes scheduler tries to keep our pods distributed across availability zones and nodes, so that if any one of them goes down, only the affected pods need to be recreated and not all of them at the same time.
- We’re using a readiness probe to check if our service is able to respond to requests. In the case of apiserver the probe is in L35-40 and is configured to fetch our “/ping” HTTP endpoint we created in Part 2: Creating the Application. For “todomanager”, which is a gRPC service, we use a simple gRPC client executed in the container to do similar readiness test requests (todomanager_deployment.yaml, L32-38).
- We set resource limits for our pods in L41-42, which is generally a good idea.
- “Apiserver_networkpolicy.yaml” defines our application firewall. The default policy is “deny”, but with apiserver we allow any incoming traffic to port 8080 (L15-21) and outgoing traffic to “todomanager” (L24-31). Additionally, we allow talking to the cluster’s DNS (L33) and services for Linkerd (L23 and L35). “Todomanager” is more restricted and is only allowed to receive traffic from “apiserver” and send traffic to “mysql”.
- “Apiserver_poddisruptionbudget.yaml” provides our pod disruption budget — information for the cluster about how many pods we’re expecting to be up, even if there is some maintenance work happening in the cluster, like node replacement. In our case, we’re requiring at least 2 pods to be always running (L10).
Now that all the pieces are in place we’re almost ready to deploy our application to the Kubernetes cluster. Unfortunately, we have to keep our default chart files so they are usable by our CI/CD pipeline, which releases public images and the chart as described in the short version. This makes them not usable directly by Helm. So, to make it work with the code we have by default in the github repository, we need to edit two files. To make it easier, the repository contains the files with necessary changes and you just need to replace them to be able to use our helm chart on your local minikube cluster.
Copy:
- “helm/local_chart/Chart.yaml” to “helm/giantswarm-todo-app/Chart.yaml”
- “helm/local_chart/values.yaml” to “helm/giantswarm-todo-app/values.yaml”.
Finally, our Helm chart is ready and we can deploy it:
helm install --name gs-todo --namespace todo ./helm/giantswarm-todo-appLet’s first list our Helm releases:
helm listLet’s now check that everything is up with:
kubectl -n todo get podsAfter a few minutes you should see all pods “Running” and “2/2” in the “Ready” column. As you might remember, we have just one container in each pod, but Linkerd injected another one, “linkerd-proxy”, so we get two containers in each Pod and the “2/2” Pod status.
In Part 4, we'll be ready to see our application and the cloud-native stack in action! Stay tuned.
About Giant Swarm
When running Kubernetes clusters in production, you will realize that you will need more, sometimes much more, than just one cluster. You will need to care not only about the deployment but also upgrades, security issues, and monitoring.
That’s where Giant Swarm can help — we offer managed Kubernetes clusters so that you don’t have to worry about managing them yourself. We also offer managed applications — well-known cloud-native projects that we can run for you on top of your Kubernetes cluster, creating a fully managed cloud-native platform.

Part 5: Traces of Your Microservices
Introduction Welcome to the fifth part of our blog series that focuses on how to develop, deploy, and debug microservices running in the cloud-native …
Part 6: Prometheus — The Hidden Hero
Intro Let’s take a look back before we move forward. In our story so far, we’ve built our demo app (Part 1 and Part 2). Next up, in Part 3, we learned …

What you Yaml is What you get - Using Helm without Tiller
When starting with Kubernetes, learning how to write manifests and bringing them to the apiserver is usually the first step. Most probably kubectl app …