by Fernando Ripoll on Jul 1, 2021
Introduction
Now that we know what we should be looking at — the cost drivers. Let’s dive into what we can do with these moving parts to optimize costs. In this installment of the series, we'll present the many things you can do to optimize your compute costs.
Compute
The basic Kubernetes concepts that relate to and affect compute resources are:
🤖 Nodes
Nodes represent the compute resource boundary where your pods are scheduled. It runs a Kubernetes agent (Kubelet) which connects with the API and exposes its capacity in terms of available resources on the machine (CPU, memory, storage...).
Although capacity defines the number of resources available in the node, users should take into account some of these resources are consumed by system components (systemd, sshd...) as well as Kubernetes components (container runtime and kubelet). For that reason, nodes offer an “allocatable” output with the final capacity for each resource type. In addition, in most of the clusters, the platform team runs some daemonsets, like logging, monitoring, and others, to ensure the reliability of the platform. Those should be accounted for too before selecting the type of machine to run in the cluster.
🤖 Pods
Once you know how many available resources you have, you need to define resource requests for your application. This will provide the necessary information to Kubernetes to place the pods on the nodes.
Types of resources that can be defined are CPU, memory, GPU, and other resources required to run your code.
Defining a fair and real resource set would make your cluster grow only the bare minimum. We will see different ways to help you find the proper values.
🤖 Scheduler
The scheduler uses the resource requests to find room on a node for the pod. The thing is, the scheduler doesn’t care about usage. So, it doesn’t check if the resources are in use or not. You asked for it, you got it.
This may cause situations in which resources, that cost money, remain idle.
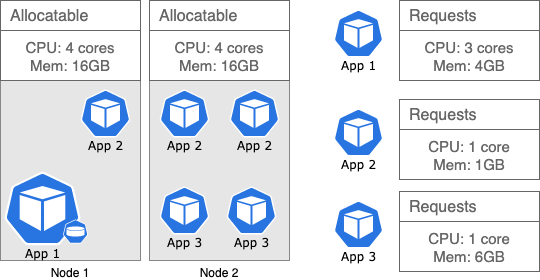
Figure 1
An example of this can be seen in figure 3, above. Node 1, is hosting two different apps. In this case, all the compute resources are being used, but only 5GB of the 16GB of memory is in use. Which leaves 9GB of memory unused, or in other words, wasted. Node 2 there is hosting four apps of two kinds that are taking advantage of all the resources available on the node.
For that reason, having an inventory of applications and resources can help you to decide on the type of machines you want to request from your cloud provider.
Recommendations
The ideal scenario is to find some way to ensure that resources are used in the most efficient manner. The solution is available to those who are intentional about cluster sizing.
You need to pay attention to the following things:
Select the right machine/instance type based on the application resources. This gives a notion of the number of machines needed and how the pods will be distributed between nodes. Having three or four pods on a node has different implications than having hundreds of pods on a node.
The way to find the optimal setup is iterative.
We recommend you start with your biggest application and examine its requested resources. Then, choose the instance type that best suits the needed capacity. Don't forget to account for the system/core components that run in every machine. You will also need to account for the projected growth of the application. The idea is for you to have enough resources to manage peaks in usage. We typically work with our customers to make that decision so that they can leverage our vast experience.
In case a bigger machine is necessary at some point, it is an easy change. Then, loop back and do the same for smaller applications. All this to right-size your resources for your needs.
Note: Instances vary by providing different ratios of CPU and memory. Some provide more GPU than others, some are optimized for speed, etc. Cloud providers have made it easy to identify and understand which machine is optimized for which features. Check out how it looks on AWS, Azure and Google Cloud.
Create node pools with different machine/instance types for different applications. You don't need to select a single instance type for all your workloads. When you use node pools that are specific to an application, you limit the waste of resources. Since the node pool will be running machines best suited for running the specified application.
Use namespacing. Namespaces are commonly used in Kubernetes. They provide a separation of concerns between users within a single cluster. They also allow us to control how many resources our applications use. This is possible by employing resource quotas for an application. The quota can define the default as well as the maximum amount of resources that a certain container can use.
Rely on autoscaling. You've completed the groundwork and settled on an instance type that takes all your needs into account. Now, you can rely on autoscaling to keep things under control and reduce the cost to a minimum. This is one of the useful features of Kubernetes that takes away a lot of toil.
Autoscaling
Kubernetes is inherently scalable. There are many tools that allow both applications as well as infrastructure nodes to scale in and out. Scaling is based on demand, efficiency, threshold/limits, and several other metrics. There are three types of autoscaling available:
- Horizontal scaling
- Vertical scaling
- Cluster scaling
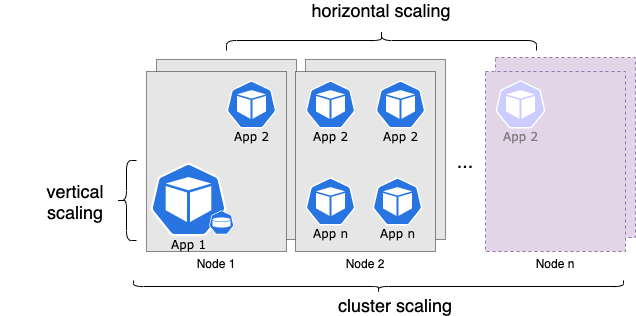
The Horizontal Pod Autoscaler (HPA) is able to scale the number of pods available in a cluster to handle the current computational workload requirements of an application. It determines the number of pods needed based on metrics set by you. It applies the creation or deletion of pods based on threshold sets. In most cases, these metrics are CPU and RAM usage, but it is also possible to specify custom metrics. The HPA continuously checks the CPU and memory metrics generated by the metrics-server installed in the Kubernetes cluster.
Depending on the booting time of your applications and acceptance criteria, coming generally from the business department, you can set the minimum and the maximum number of replicas for a given deployment.
The Vertical Pod Autoscaler (VPA) can allocate more (or less) CPU and memory resources to existing pods. It modifies the available compute resources for an application. This feature can be useful to monitor and adjust the allocated resources of each pod over its lifetime. The VPA comes with a tool called VPA Recommender. It monitors the current and past resource consumption and uses the data to provide recommended CPU and memory resources for the containers. The Vertical Pod Autoscaler does not update resource configurations for existing pods. It checks which pods have the correct resource configuration and kills the ones that don’t. The applicable controllers then recreate them with the updated configuration.
When you want to use both the HPA and VPA to manage your container resources, you may put them in conflict. When they use the same metrics (CPU and memory), both of them will try to solve the situation at once. This results in the wrong allocation of resources. It is possible to use them both if they rely on different metrics. The VPA uses CPU and memory consumption as unique sources to gather the perfect resource allocation. The HPA can use custom metrics, allowing both tools to be used in parallel.
The Cluster Autoscaler (CA) adds or removes nodes from a node pool to meet demand and save money. It leverages the scheduler, and as soon as there is a pending pod on the scheduler, it adds a pod into a node pool. If you have several node pools you will use a feature called an expander to choose which node pool gets the pending pod. The different types of expanders include; price, least-waste, priority, etc.
To enable scaling down, you need to define a threshold. Finding the perfect threshold is something you should experiment with. Once the threshold is reached the autoscaler will scale down. It will do so by draining the nodes and moving running applications to different nodes that are not full.
Combining all three autoscalers is the perfect automation to ensure optimal utilization of your compute resources. Using monitoring creates continuous feedback. It enables you to gain the experience necessary to achieve the best possible utilization. But remember, you need to keep your eyes on this to continuously improve.
Preemptible instances
Depending on the cloud you use you may know these as Spot Instances, Low-priority VMs, or Preemptible VM Instances. They also vary in their low-level features (e.g. eviction notice, graceful termination, etc.).
The commonalities are that you can bid on spare compute cloud providers have. This mechanism can save up to 75% of costs in comparison with on-demand instances. But there are no free lunches. These instances can be evicted with short notice, which varies by providers (30-120 seconds).
Our recommendation is to use preemptible instances for batch jobs or applications that are not mission-critical. Though, it's worthy to explore the combination of standard or on-demand instances with preemptible. You can set a baseline for your applications running on-demand and rely on preemptible machines for peaks in traffic. This allows you to control costs, yet still create a level of reliability for the application. It is a question of trade-offs; reliability versus costs. However, keep in mind, your application should handle gracefully a termination signal in less than the eviction time limit. In addition, it should follow good practices like pod disruption budget. In the end, it means you will need expertise and practice to understand how your applications behave in such an architecture, especially under pressure.
Summary
In this post, we unpacked how ignoring your compute resources could be a costly prospect. We also offered some strategies to take control of your compute costs and create an optimal setup. In our next post, we will be looking at the two remaining cost drivers: traffic and storage. We will also be offering some actionable suggestions for optimizing costs around traffic and storage.

Part 2: Taking control of the cost drivers
Now that you have examined your compute-related costs (if you haven’t, check out the previous post in this series) let’s dig into cost optimization of …
The finale: cost optimization in the cloud
Thanks for getting this far with us. By now you will have learned that moving workloads to Kubernetes and the public cloud will not necessarily get yo …

How Platform-as-a-Product drives cloud native platform maturity
In the dynamic landscape of cloud native technologies and predictions, a standout trend emerges: platform engineering is the new cool kid in class! In …